Pattern Guide: Curves
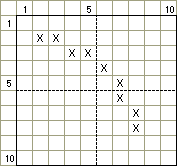
![]() Curves and straight lines combine to form every shape used in a pattern. A curve on a rectangular grid is really just a series of short, straight lines. The length and slope of each successive line segment defines how tight or broad the curve will be. Many short, steep lines make very tight curves, while fewer, long, shallow lines make very broad curves. Each line segment is added-on in the direction that you want the "inside" of the curve to be. If you want a curve that curls back on itself (like a U-shape, or a spiral) then switch the direction of the added-on line segments (see diagram). Curves are tricky, but fun, so experiment to get the shape you want.
Curves and straight lines combine to form every shape used in a pattern. A curve on a rectangular grid is really just a series of short, straight lines. The length and slope of each successive line segment defines how tight or broad the curve will be. Many short, steep lines make very tight curves, while fewer, long, shallow lines make very broad curves. Each line segment is added-on in the direction that you want the "inside" of the curve to be. If you want a curve that curls back on itself (like a U-shape, or a spiral) then switch the direction of the added-on line segments (see diagram). Curves are tricky, but fun, so experiment to get the shape you want.
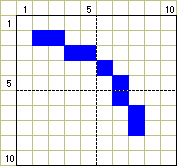
![]() Even more so than straight lines, curves may or may not appear smooth and continuous when stitched. Square stitches are much more suitable for curved lines than uni-directional stitches, especially if the direction of the curve changes. The smoothness of a curve depends a lot on how many slope changes are used, relative to the length of the curve. Frequent, abrupt slope changes will tend to make a curve look choppy, while using few or gradual slope changes will give the appearance of a smooth transition from one slope to the next. For this reason, broad curves tend to appear smoother than tight curves on the whole. In the example below, parallel curves and straight lines worked in cross-stitch are shown for comparison. Note that care must be taken when plotting parallel curving lines to match each line segment (otherwise the lines quickly converge or diverge).
Even more so than straight lines, curves may or may not appear smooth and continuous when stitched. Square stitches are much more suitable for curved lines than uni-directional stitches, especially if the direction of the curve changes. The smoothness of a curve depends a lot on how many slope changes are used, relative to the length of the curve. Frequent, abrupt slope changes will tend to make a curve look choppy, while using few or gradual slope changes will give the appearance of a smooth transition from one slope to the next. For this reason, broad curves tend to appear smoother than tight curves on the whole. In the example below, parallel curves and straight lines worked in cross-stitch are shown for comparison. Note that care must be taken when plotting parallel curving lines to match each line segment (otherwise the lines quickly converge or diverge).
