Stitch Guide: Cross Stitch

![]() Cross Stitch is a simple and versatile needlepoint stitch, only slightly more complicated than the basic Tent Stitch. Yarn is first laid diagonally, from lower left to upper right, as in a tent stitch, then a second strand is laid from lower right to upper left, over the same canvas grid. The two-strand stitch may be worked horizontally, vertically, or diagonally, producing the same effect on the right side of the canvas. Unlike the various tent-stitch working methods, cross-stitch always pulls the canvas uniformly in all directions because of its square shape.
Cross Stitch is a simple and versatile needlepoint stitch, only slightly more complicated than the basic Tent Stitch. Yarn is first laid diagonally, from lower left to upper right, as in a tent stitch, then a second strand is laid from lower right to upper left, over the same canvas grid. The two-strand stitch may be worked horizontally, vertically, or diagonally, producing the same effect on the right side of the canvas. Unlike the various tent-stitch working methods, cross-stitch always pulls the canvas uniformly in all directions because of its square shape.
In the image at top-right, multiple lines and blocks of cross stitches in contrasting colors are used to outline and fill a ribbon-like pattern. The blocky, compact nature of cross-stitch is well-suited to depicting small-scale features.
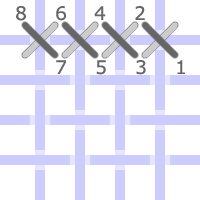
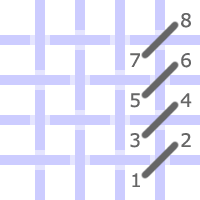
![]() Working Method #1: Cross stitches can be worked individually, either in rows or columns, by completing each stitch in turn before moving on to the next one. This method is a bit tedious, but works well for lines and small areas.
Working Method #1: Cross stitches can be worked individually, either in rows or columns, by completing each stitch in turn before moving on to the next one. This method is a bit tedious, but works well for lines and small areas.
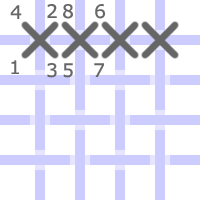
Individual Cross Stitches worked horizontally
([How To Read This Chart])
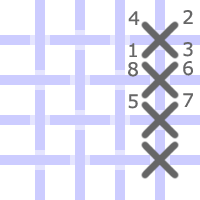
Individual Cross Stitches worked vertically
([How To Read This Chart])
To work multiple rows of individual cross stitches, the canvas is turned 180° after each row, so that the top of the pattern is alternately pointing towards or away from you as you work. This also preserves the single working direction while the stitches are being laid back-and-forth (or up-and-down) across the canvas relative to the pattern. Note that generally speaking, the top strands of each stitch should be parallel to each other.
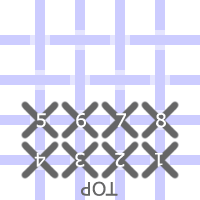
Multiple Rows of Cross Stitch
([How To Read This Chart])
![]() Working Method #2: Cross stitch can also be worked in groups. The first strand only is laid down for an entire row or column, then each stitch is completed by working in the reverse direction. This method is very fast, and especially good for filling in large areas. Beware however, that should you need to pick out a stitch, you'll have to remove the entire row or column to get to it securely. Multiple rows or columns are worked in the same back-and-forth way, without any need to turn the canvas.
Working Method #2: Cross stitch can also be worked in groups. The first strand only is laid down for an entire row or column, then each stitch is completed by working in the reverse direction. This method is very fast, and especially good for filling in large areas. Beware however, that should you need to pick out a stitch, you'll have to remove the entire row or column to get to it securely. Multiple rows or columns are worked in the same back-and-forth way, without any need to turn the canvas.
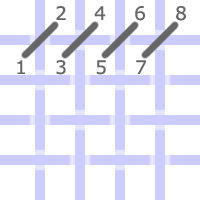
Multiple Cross Stitches worked horizontally
- First strand
([How To Read This Chart])
Multiple Cross Stitches worked horizontally
- Second strand
([How To Read This Chart])
Multiple Cross Stitches worked vertically
- First strand
([How To Read This Chart])

Multiple Cross Stitches worked vertically
- Second strand
([How To Read This Chart])