Stitch Guide: Tent Stitch
![]() Tent Stitch is the simplest and most versatile needlepoint stitch. Yarn is laid diagonally over a single canvas grid, from lower left to upper right. The stitch may be worked horizontally, vertically, or diagonally, producing the same effect on the right side of the canvas. The different working methods can pull the canvas in different ways, distorting the work over time regardless of stitch tension (how tightly the yarn is pulled over the canvas [More]).
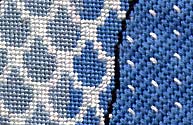
Tent Stitch is the simplest and most versatile needlepoint stitch. Yarn is laid diagonally over a single canvas grid, from lower left to upper right. The stitch may be worked horizontally, vertically, or diagonally, producing the same effect on the right side of the canvas. The different working methods can pull the canvas in different ways, distorting the work over time regardless of stitch tension (how tightly the yarn is pulled over the canvas [More]).
Also of note, the different methods use different amounts of yarn to cover the same area of canvas. Generally speaking, the choice of method depends on the combination of yarn and canvas, as well as the shape and size of pattern area to be filled. In the image at top-right, tent stitch in varying shades (left and center) is used to densely fill a series of interlocking irregular pattern areas. A single curved line of tent in a contrasting color is also used as an outline (just right of center).
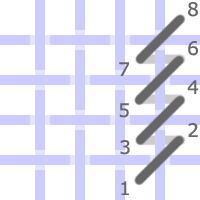
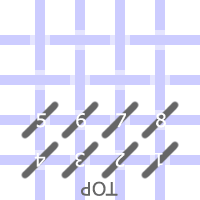
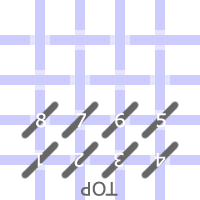
![]() Working Method #1: Tent worked left-to-right or bottom-to-top is called Half-Cross Tent. It forms a pattern of one-grid-tall vertical floats (yarn carried on the wrong-side between stitches [More]) when worked horizontally, and forms one-grid-wide horizontal floats when worked vertically. These short floats save yarn, but can distort mono canvas (canvas formed by single-thread intersections [More]).
Working Method #1: Tent worked left-to-right or bottom-to-top is called Half-Cross Tent. It forms a pattern of one-grid-tall vertical floats (yarn carried on the wrong-side between stitches [More]) when worked horizontally, and forms one-grid-wide horizontal floats when worked vertically. These short floats save yarn, but can distort mono canvas (canvas formed by single-thread intersections [More]).

Half-Cross Tent worked horizontally
([How To Read This Chart])
Half-Cross Tent worked vertically
([How To Read This Chart])
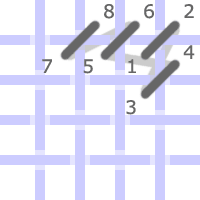
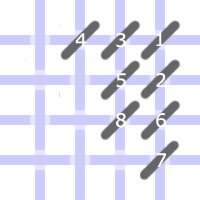
![]() Working Method #2: Tent worked right-to-left or top-to-bottom is called Continental Tent. It forms a pattern of two-by-one-grid-long diagonal floats whether worked horizontally or vertically. These longer floats do not distort mono canvas, but use more yarn than the Half-Cross method.
Working Method #2: Tent worked right-to-left or top-to-bottom is called Continental Tent. It forms a pattern of two-by-one-grid-long diagonal floats whether worked horizontally or vertically. These longer floats do not distort mono canvas, but use more yarn than the Half-Cross method.
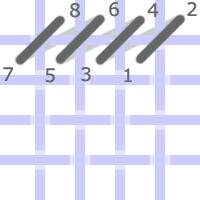
Continental Tent worked horizontally
([How To Read This Chart])
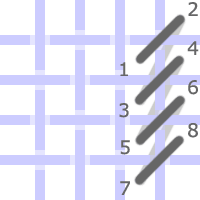
Continental Tent worked vertically
([How To Read This Chart])
To work multiple rows in the Half-Cross and Continental methods, the canvas is turned 180° after each row, so that the top of the pattern is alternately pointing towards or away from you as you work. This also preserves the single working direction while the stitches are being laid back-and-forth (or up-and-down) across the canvas relative to the pattern. Both the Half-Cross and Continental methods work very well for slender shapes, and for irregular areas if worked as small rectangular patches.
Multiple Rows of Half-Cross Tent
([How To Read This Chart])
Multiple Rows of Continental Tent
([How To Read This Chart])
![]() Working Method #3: Basketweave Tent is worked diagonally, in alternating directions across the canvas. In one direction, the row is laid from bottom-right to upper-left, in between the stitches of the previous row, and leaving spaces for the next row of stitches. In the other direction, the row is laid from upper-left to bottom-right. The floats are two-grids-wide when working towards the top and two-grids-tall when working towards the bottom. These medium-length floats alternate in direction, forming a flat woven pattern on the wrong-side of the canvas.
Working Method #3: Basketweave Tent is worked diagonally, in alternating directions across the canvas. In one direction, the row is laid from bottom-right to upper-left, in between the stitches of the previous row, and leaving spaces for the next row of stitches. In the other direction, the row is laid from upper-left to bottom-right. The floats are two-grids-wide when working towards the top and two-grids-tall when working towards the bottom. These medium-length floats alternate in direction, forming a flat woven pattern on the wrong-side of the canvas.
When working multiple rows in the Basketweave method, the canvas is kept in one direction only (no turning means this is a good method for stationary frames) and the stitching fills the canvas from the upper-right corner to the lower-left corner. Slender and irregular shapes are awkward to work in the Basketweave method, but it is a very efficient method for filling in backgrounds and large open areas.
Basketweave Tent worked diagonally
([How To Read This Chart])
Multiple Rows of Basketweave Tent
([How To Read This Chart])